Zimbra In an Hour
After spending a great deal of time the Zimbra forums helping others setup DNS and other assorted issues to get Zimbra servers up and running, I decided to create a quick tutorial on how to get up and running with Zimbra on Ubuntu 8.04.
For my installation, I'm using zimbra.whatan00b.com as my hostname and my IP is 10.211.55.9. I'm going to use i386 Ubuntu 8.04 server and Zimbra OS 5.0.7 (Zimbra 5.0.9 was actually released for the Ubuntu 8.04 platform during my writing, but at the beginning, 5.0.7 was the newest package available.). I used Webmin for management of the DNS server. it's a little bit overkill for this project, but it seems to give beginners to bind some 'training wheels' for (hopefully) a slightly less steep learning curve. A small amount of Linux knowledge and comfort with the command line is required.
The partitioning and installation is outside the scope of this tutorial, but to begin I did a default install and picked the DNS server and SSH server "bundles" during the installation. You can run Zimbra on an existing web server if you should choose, but it gets a little more complicated and is outside the scope of this document. I am also assuming that the server is behind a NAT and you have properly configured all public-facing firewalls and DNS. For the setup, we will follow the Zimbra wiki steps on configuring a "Split DNS" for internal DNS resolution.
Before we get started, I want to add a disclaimer. This quick tutorial is meant for use in a proof-of-concept testing environment and to get a quick overview of the components necessary to get going. Please do not follow these steps and consider the machine production-ready. I do not cover setting up SSL on the web client or other services (the administration console uses SSL 'out of the box'). With that out of the way and since we only have an hour, let's get going.
We'll begin by pulling down the Zimbra installer. You can find the Zimbra open source installers here. That'll take a little while, so you can get that started running and flip over to a different terminal and keep moving once the download starts. For the current version at the time of writing, you can run:
wget http://downloads.sourceforge.net/zimbracommunity/zcs-5.0.7_GA_2450.UBUNTU8.FRANKLIN.tgz?modtime=1215025916&big_mirror=0
Now, we need to get rid of apparmor for Zimbra:
sudo apt-get purge apparmor
I then did a quick update just for good measure:
    sudo apt-get update
    sudo apt-get upgrade
Next, we'll configure our local DNS server. For my example, I used Webmin to configure my zone(s). First, let's download and install webmin:
    wget http://prdownloads.sourceforge.net/webadmin/webmin_1.430_all.deb
    dpkg --install webmin_1.430_all.deb
Dpkg will fail due to dependencies here, so we'll have to go get those:
sudo apt-get install libnet-ssleay-perl openssl libauthen-pam-perl libio-pty-perl libmd5-perl
Once completed, you can connect to Webmin using a web browser on another machine. Since my example server is at IP address 10.211.55.9, I'll connect to: https://10.211.55.9:10000. You can login with any user that has sudo access or with root.
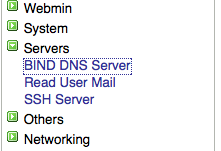
After logging in to Webmin, click on Servers, then click on "BIND DNS Server".
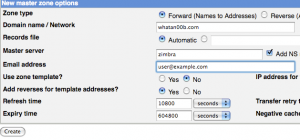
Then click on "Create master zone".
You will need to create an "Address" with the same name as your hostname.
Be sure to put a "." at the end of the FQDN. Then you'll need to add a mail server to your new zone:
You can leave the Name blank empty and fill in the hostname (with a "." at the end, remember) for the "Mail Server" blank and a priority of 10. Once you are done, apply the changes for the zone.
Next, we'll need to edit the /etc/resolv.conf file to point to our new DNS server. You can use your favorite editor to open the file, I used vim:
sudo vim /etc/resolv.conf
You will need to add a line at the beginning of the file or replace the first namserver line to read:
nameserver localhost
Now, you should be able to resolve your hostname and MX record for the zone you setup. To make sure, we'll do a dig on our domain:
wyatt@zimbra:~$ dig MX whatan00b.com
; <<>> DiG 9.4.2 <<>> MX whatan00b.com

;; global options:  printcmd

;; Got answer:

;; ->>HEADER<<- opcode: QUERY, status: NOERROR, id: 12138

;; flags: qr aa rd ra; QUERY: 1, ANSWER: 1, AUTHORITY: 1, ADDITIONAL: 1


;; QUESTION SECTION:

;whatan00b.com.         IN  MX


;; ANSWER SECTION:

whatan00b.com.      38400   IN  MX  10 zimbra.whatan00b.com.


;; AUTHORITY SECTION:

whatan00b.com.      38400   IN  NS  zimbra.


;; ADDITIONAL SECTION:

zimbra.whatan00b.com.   38400   IN  A   10.211.55.9


;; Query time: 1 msec

;; SERVER: 127.0.0.1#53(127.0.0.1)

;; WHEN: Mon Aug 18 22:39:28 2008

;; MSG SIZE  rcvd: 90


wyatt@zimbra:~$ dig zimbra.whatan00b.com


; <<>> DiG 9.4.2 <<>> zimbra.whatan00b.com

;; global options:  printcmd

;; Got answer:

;; ->>HEADER<<- opcode: QUERY, status: NOERROR, id: 51649

;; flags: qr aa rd ra; QUERY: 1, ANSWER: 1, AUTHORITY: 1, ADDITIONAL: 0


;; QUESTION SECTION:

;zimbra.whatan00b.com.      IN  A


;; ANSWER SECTION:

zimbra.whatan00b.com.   38400   IN  A   10.211.55.9


;; AUTHORITY SECTION:

whatan00b.com.      38400   IN  NS  zimbra.


;; Query time: 1 msec

;; SERVER: 127.0.0.1#53(127.0.0.1)

;; WHEN: Mon Aug 18 22:40:09 2008

;; MSG SIZE  rcvd: 74
Now that we can resolve our host, we'll need to setup our /etc/hosts file. You'll want to make sure that the hostname is set to what you want it to resolve as (mine is zimbra.whatan00b.com), then add it to the /etc/hosts file:
sudo vim /etc/hosts
Mine looks like this:
    127.0.0.1   localhost
    10.211.55.9 zimbra.whatan00b.com zimbra
We just need some prerequisites and we're ready to go:
sudo apt-get install fetchmail libpcre3 libgmp3c2 libxml2 libstdc++5 libltdl3
Now we're ready to rock with our actual Zimbra installation. Let's extract the installer and get going:
    tar zxvf zcs-5.0.7_GA_2450.UBUNTU8.FRANKLIN.tgz
    cd zcs-5.0.7_GA_2450.UBUNTU8.FRANKLIN
    sudo ./install.sh
The installer will get going and have you accept the license agreement and check out prerequisites. If one is missing, you can do a quick sudo apt-get install for whatever package is missing. I accepted all the default packages (ldap, logger, mta, snmp, store, apache, spell). Then you'll want to type 'y' to continue the installation. The installer will then install the core packages on your system. Once that's done, we begin the configuration.
The first part of the configuration is the most crucial and problematic part to users: DNS setup. The installer will first try to do an MX lookup using your machine's hostname as the domain name. For my install, I changed the domain when prompted and changed it to "whatan00b.com":
    DNS ERROR resolving MX for zimbra.whatan00b.com
    It is suggested that the domain name have an MX record configured in DNS
    Change domain name? [Yes]
    Create Domain: [zimbra.whatan00b.com] whatan00b.com
    MX: zimbra.whatan00b.com (10.211.55.9)
Interface: 10.211.55.9
Interface: 127.0.0.1
done.
You will then be taken to the Zimbra configuration wizard. You can set any of the preferences you like, but the only required one is to set the admin username. You use the numbers and letters to navigate the menus to set properties. To set the admin user password, you first type '3' to get to the Zimbra "Store configuration" menu, type '4' to set the password. Then you use 'r' to get back to the main menu and 'a' to finish. The installer will take some time to finish and the time it takes really depends upon the hardware you're using. I used a virtual machine inside Parallels on my MacBook so it took about half an hour to complete. At the end of the install it will start the services for you.
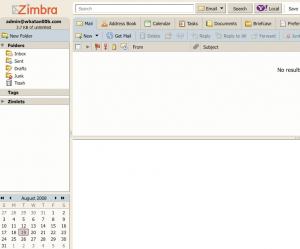
Once through the install, hop onto your favorite web browser and see if you can log in. For my instance, I navigated to: http://10.211.55.9 and up came the Zimbra sign-in page and logged in.
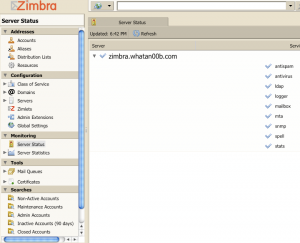
You can login to the administration console at https://10.211.55.9:7071 after accepting the self-signed certificates, of course. Once into the administration console, you can go ahead and start adding domains and users at will.
That's it! You're ready to start hacking away. If you're stuck on a step, feel free to ask in the comments below or post in the Zimbra forums.
More Info
For more info on tuning your Zimbra server, check out my article on tuning Zimbra to use fewer resources.
For do-it-yourself troubleshooting or a deeper understanding of what's going on in this setup, you may also want to check out my article on some of the pitfalls of Zimbra installation as well!


Comments
Comments powered by Disqus